
To start with your indesign file, I will teache you a few basic after which you will have a little hang of what to do, also if you have previously used photoshop or illustrator you already know the basics,


So to start of what we will do is since our background for the website will be the one we made in photoshop (the one with the less opacity of the image) we will put it on the “A master” page, go to windows and make sure pages has a tick infront of it, go to your pages and scroll up.
now what is the purpose of the a master page? Whatever we put in our A master page will be visible in all of our pages, in which case we don’t have to aligh or worry about the addition of the layout every single time we design a new page.
Here is a short video tutorial i found online of how to apply master A page if you are still a little confused about it,
(“Creating and Applying Master Pages in Adobe InDesign”, 2017)
Since my home page has the image in full opacity what I did is I went back to my photoshop master file and I disabled all the layers but the one with the image and saved it as a PNG file, with the PNG file I have the image in rectangles with a transparent background, note that if I had save the image in jpeg it would have a white background not a transparent one.
Now the next thing we do is we add buttons so on the A-Master page we will add our
- About us
- Gallery
- Location
- Reservation
- Menu
- Promotions
We will use a normal text box like we do in photoshop to add our text in any font style and size we like, the font I used through out my website is Avenir.
Once we are done writing the names in the text box, we will start making our pages atleast one page per title and bookmark every single page
How to bookmark:
Go on the page you need to bookmark and click on object > interactive >convert to button

And it will open this window;

Click on book marks
and you will see this

Click on the create new book mark button 
And create a new bookmark for that page(my tab has a lot of bookmarks don’t get confused yours will be empty as it will be your first bookmark.
Once you have created your bookmark go to the text box and select it then click on the button and forms
and you will get this window

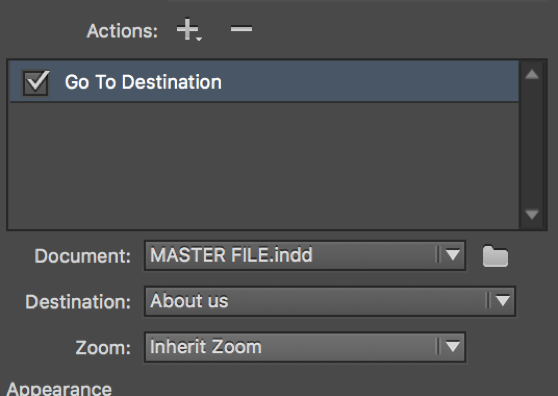
Write down the button name and in event choose on click, then click the plus sign next to action and click go to destination

in the destination tab choose the bookmark you created for the about us page and it will be linked.
You can even personalize the buttons, changing its font to bold or background to color on click and rool over by changing the setting in the appearence tab.

now you know how to customize an indesign file and create buttons you can make many more buttons and create many different things, in this website now you will have all the buttons you add on the master page to be interactive in all the other pages, if in any page you don’t want the A master default you can just choose none instead of none and drag and drop on the page.

Here are a few extra sites and videos i found for indesign tutorials, hope it helps you:
(“How To Get Started With Adobe InDesign CC – 10 Things Beginners Want To Know How To Do”, 2017)
https://design.tutsplus.com/series/beginners-guides-to-indesign–vector-4951
(“Beginners Guides to InDesign – Envato Tuts+ Design & Illustration Tutorials”, 2017)
References
Beginners Guides to InDesign – Envato Tuts+ Design & Illustration Tutorials. (2017). Design & Illustration Envato Tuts+. Retrieved 1 April 2017, from https://design.tutsplus.com/series/beginners-guides-to-indesign–vector-4951
How To Get Started With Adobe InDesign CC – 10 Things Beginners Want To Know How To Do. (2017). YouTube. Retrieved 1 April 2017, from https://www.youtube.com/watch?v=qzE6nZofaI0&t=89s
(“Creating and Applying Master Pages in Adobe InDesign”, 2017)

April 13, 2017 at 9:39 am
I like the design of your website it’s really good! I like how informative this tutorial with the help of screenshots. ((:
LikeLiked by 1 person